> ## Documentation Index
> Fetch the complete documentation index at: https://docs.pangolin.net/llms.txt
> Use this file to discover all available pages before exploring further.
# Site to Cloud
> Turn a remote node into a network concentrator that routes traffic between a cloud VPC and your Pangolin sites
Fastest way to get started with Pangolin using the hosted control plane. No credit card required.
Site to cloud is an advanced [remote node](/manage/remote-node/understanding-nodes) configuration available in [Pangolin Cloud](https://app.pangolin.net/auth/signup).
A standard remote node terminates WireGuard tunnels and proxies HTTP(S) traffic to your resources. A **backhaul** node goes a step further: it acts as an IP router between an entire network, such as a cloud VPC, and your Pangolin sites. Instead of just forwarding individual resource connections, the node forwards whole subnets, letting hosts on either side reach each other without installing Newt on every machine.
This is useful when you want to bridge a cloud network (for example, an AWS VPC) with your on-prem or office network through Pangolin, using a node running in that VPC as the concentrator.
Site to cloud builds on top of a normal remote node install. Read [Remote Nodes](/manage/remote-node/understanding-nodes) and [Quick Install Guide](/manage/remote-node/quick-install-remote) first if you haven't deployed a node yet.
## How It Works
* **The node routes, it doesn't just proxy.** Gerbil creates the WireGuard interface directly on the host and Docker forwards packets between it and the host's network, rather than isolating traffic inside a container network namespace.
* **The cloud network learns to route to the node.** You add a route in your VPC (or other network) so that traffic destined for the Pangolin overlay is sent to the node.
* **The node learns to route to the cloud network.** You register the VPC's CIDR on the node so it's pushed down to your sites as a route.
* **Sites route natively.** Sites connect with Newt's native routing mode so the tunnel subnet is a real route on the site's host, not just an application-layer proxy.
## Prerequisites
* A Linux server with Docker and root access, dedicated to running the backhaul node.
* Administrative access to the cloud network you want to bridge (for example, an AWS VPC) so you can edit security groups, route tables, and instance settings.
## Enable IP Forwarding on the Host
Because the node forwards packets between the WireGuard tunnel and the host network instead of only terminating them, the host must have IP forwarding enabled.
```bash theme={"theme":"gruvbox-light-hard"}
sudo sysctl -w net.ipv4.ip_forward=1
```
Make it permanent by adding `net.ipv4.ip_forward=1` to `/etc/sysctl.d/99-pangolin-backhaul.conf`.
Docker enables forwarding in its own iptables rules by default, but if you've disabled Docker's iptables management, or packets are still being dropped, allow forwarded traffic through Docker's chain in `/etc/docker/daemon.json`:
```json title="/etc/docker/daemon.json" theme={"theme":"gruvbox-light-hard"}
{
"ip-forward-no-drop": true
}
```
Restart Docker after changing this file. See Docker's [packet filtering and firewalls guide](https://docs.docker.com/engine/network/packet-filtering-firewalls/#docker-on-a-router) for background on running Docker on a router.
## Deploy the Node with Host Networking
The standard node install runs Gerbil and Traefik on a bridge network, with Traefik sharing Gerbil's network namespace. For backhaul, all three services run with `network_mode: host` instead. This gives Gerbil direct access to the host's network stack and routing table, which is required for it to create routes for the subnets you register instead of only handling its own tunnel traffic.
```yaml title="docker-compose.yml" theme={"theme":"gruvbox-light-hard"}
name: pangolin
services:
pangolin:
image: docker.io/fosrl/pangolin-node:latest
container_name: pangolin
restart: unless-stopped
network_mode: host
volumes:
- ./config:/app/config
- pangolin-data-certificates:/var/certificates
- pangolin-data-dynamic:/var/dynamic
healthcheck:
test: ["CMD", "curl", "-f", "http://localhost:3001/api/v1/"]
interval: "10s"
timeout: "10s"
retries: 15
gerbil:
image: docker.io/fosrl/gerbil:latest
container_name: gerbil
restart: unless-stopped
network_mode: host
depends_on:
pangolin:
condition: service_healthy
command:
- --reachableAt=http://localhost:3003
- --generateAndSaveKeyTo=/var/config/key
- --remoteConfig=http://localhost:3001/api/v1/
volumes:
- ./config/:/var/config
cap_add:
- NET_ADMIN
- SYS_MODULE
traefik:
image: docker.io/traefik:v3.5
container_name: traefik
restart: unless-stopped
network_mode: host
depends_on:
pangolin:
condition: service_healthy
command:
- --configFile=/etc/traefik/traefik_config.yml
volumes:
- ./config/traefik:/etc/traefik:ro
- ./config/traefik/logs:/var/log/traefik
- pangolin-data-certificates:/var/certificates:ro
- pangolin-data-dynamic:/var/dynamic:ro
volumes:
pangolin-data-dynamic:
pangolin-data-certificates:
```
With `network_mode: host`, containers bind to ports directly on the host, so there's no `ports` mapping and no `network_mode: service:gerbil` on Traefik like there is in the [standard install](/self-host/manual/docker-compose). Gerbil and Traefik reach each other and Pangolin over `localhost`.
## Configure the Node
The `config.yml` for a backhaul node uses the same fields as any [remote node](/manage/remote-node/config-file), mounted at `config/config.yml`:
```yaml title="config/config.yml" theme={"theme":"gruvbox-light-hard"}
gerbil:
start_port: 51820
base_endpoint: "203.0.113.10" # REPLACE WITH YOUR NODE'S PUBLIC IP OR DOMAIN
reachable_at: http://localhost:3003
server:
internal_port: 3001
internal_hostname: localhost
managed:
id: "he4g78wevj25msf"
secret: "n7sd18twfko0q0vrb7wyclqzbvvnx1fqt7ezv8xewhdb9s7d"
```
See the [configuration file reference](/manage/remote-node/config-file) for every available option.
## Configure Traefik
Traefik's config is largely the same as a standard node, with `trustedIPs` opened up to accept the proxy protocol header from Gerbil on the host network:
```yaml title="config/traefik/traefik_config.yml" theme={"theme":"gruvbox-light-hard"}
api:
insecure: true
dashboard: true
providers:
file:
directory: "/var/dynamic"
watch: true
experimental:
plugins:
badger:
moduleName: "github.com/fosrl/badger"
version: "v1.3.1"
log:
level: "INFO"
format: "common"
maxSize: 100
maxBackups: 3
maxAge: 3
compress: true
entryPoints:
web:
address: ":80"
websecure:
address: ":443"
proxyProtocol:
trustedIPs:
- 0.0.0.0/0 # This is coming from Gerbil
- ::1/128
transport:
respondingTimeouts:
readTimeout: "30m"
serversTransport:
insecureSkipVerify: true
ping:
entryPoint: "web"
```
## Configure the Cloud Network
This section uses AWS as an example, but the same steps apply to any VPC-style network: the node needs to be allowed to receive and forward traffic for the whole network, and the network needs a route pointing back at the node.
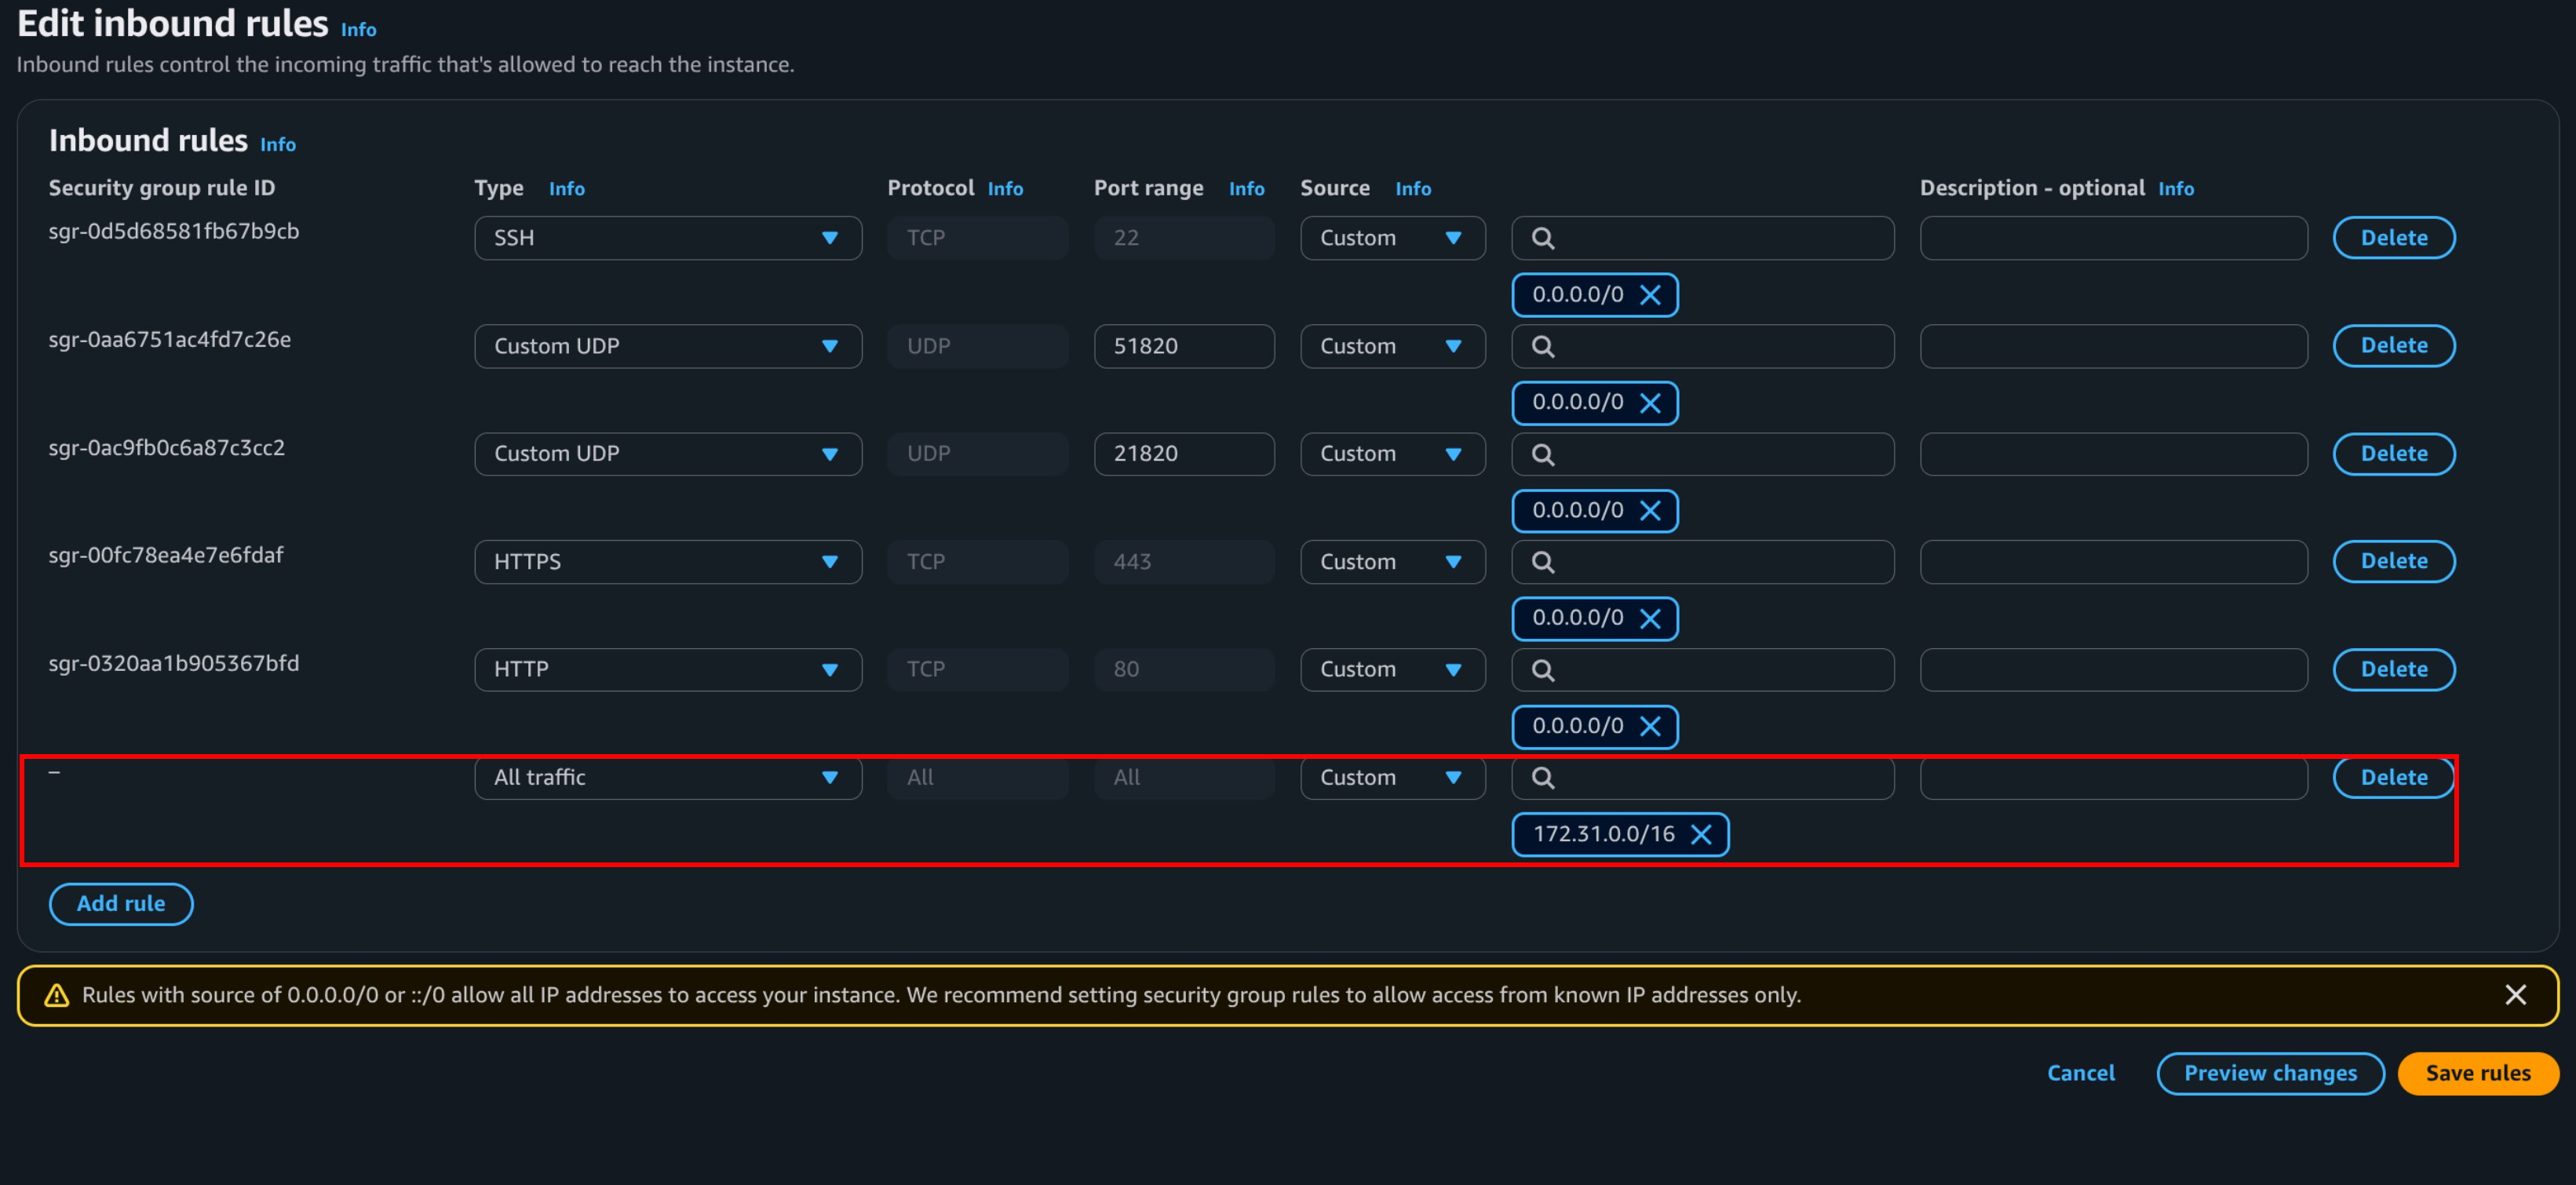
The node is acting as a concentrator for the whole network, not just serving its own ports, so its security group must accept all traffic from the VPC's CIDR. Otherwise the security group blocks the inbound traffic it's meant to forward.
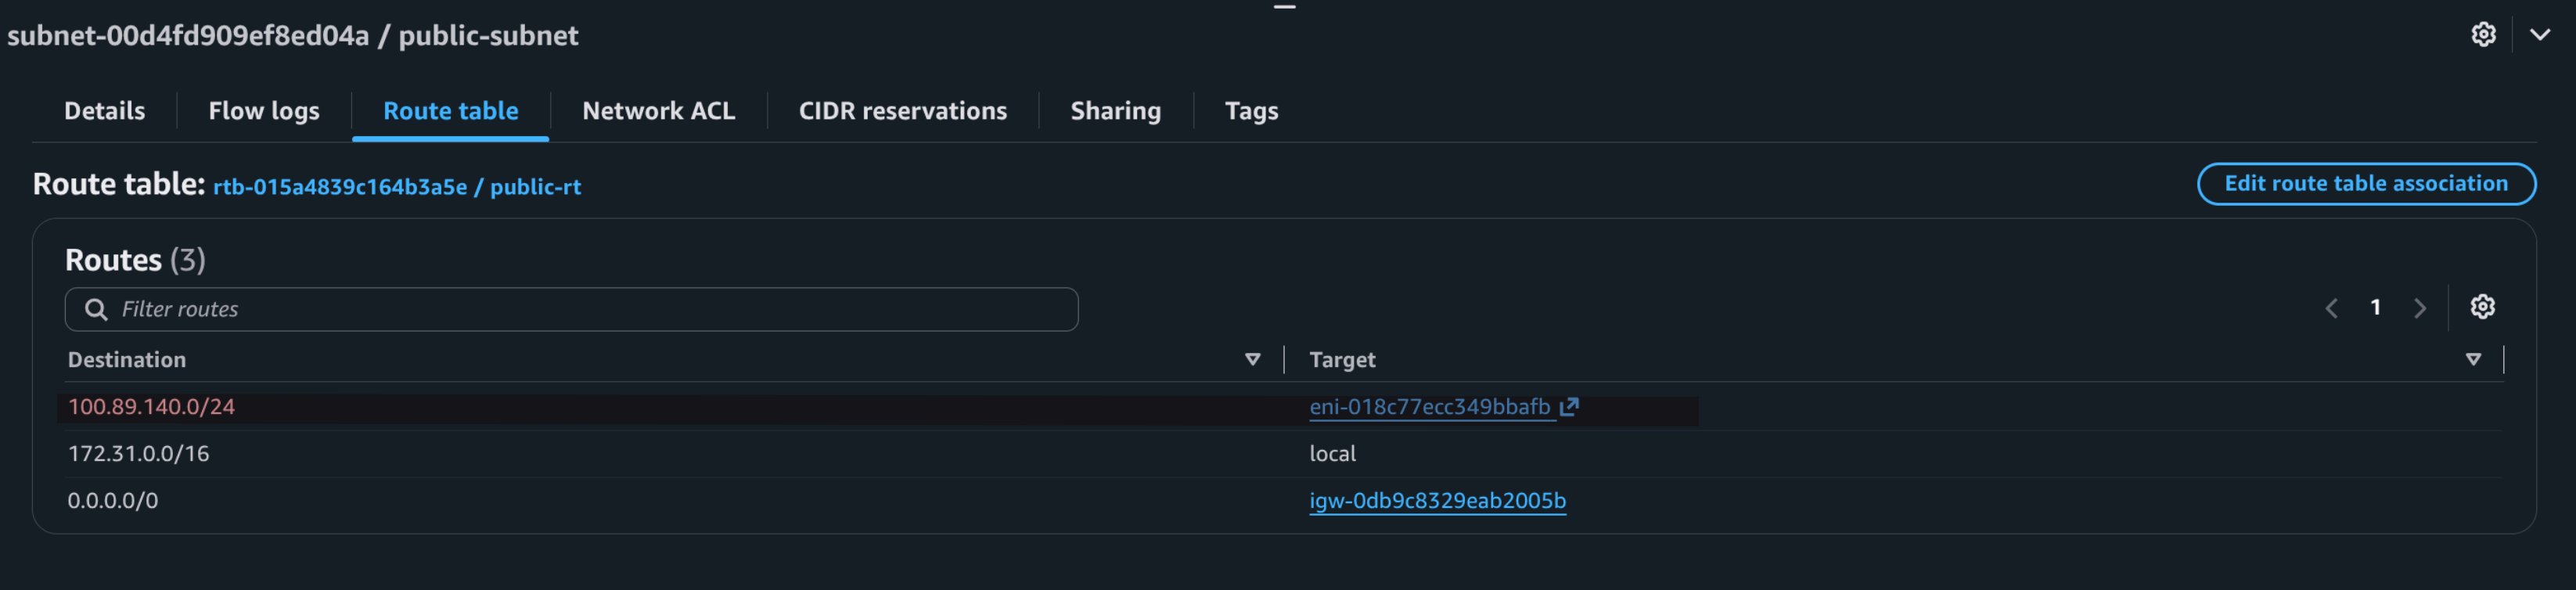
 Add a route in the VPC's route table for the WireGuard overlay subnet assigned to your node (shown as the node's **Address** on its page in the [Pangolin dashboard](https://app.pangolin.net)), targeting the node's instance or network interface. This tells the rest of the VPC to send anything destined for the Pangolin overlay — other sites and clients — to the node.
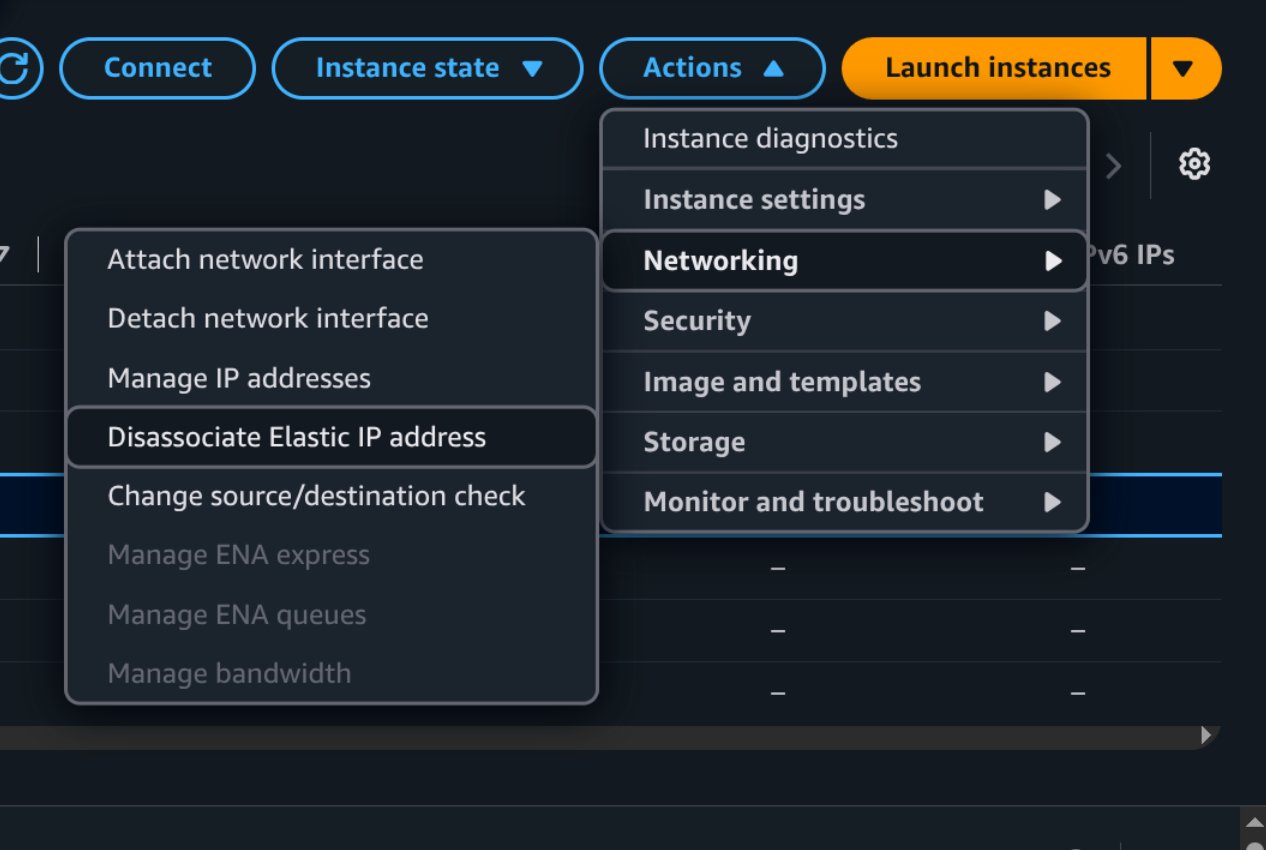
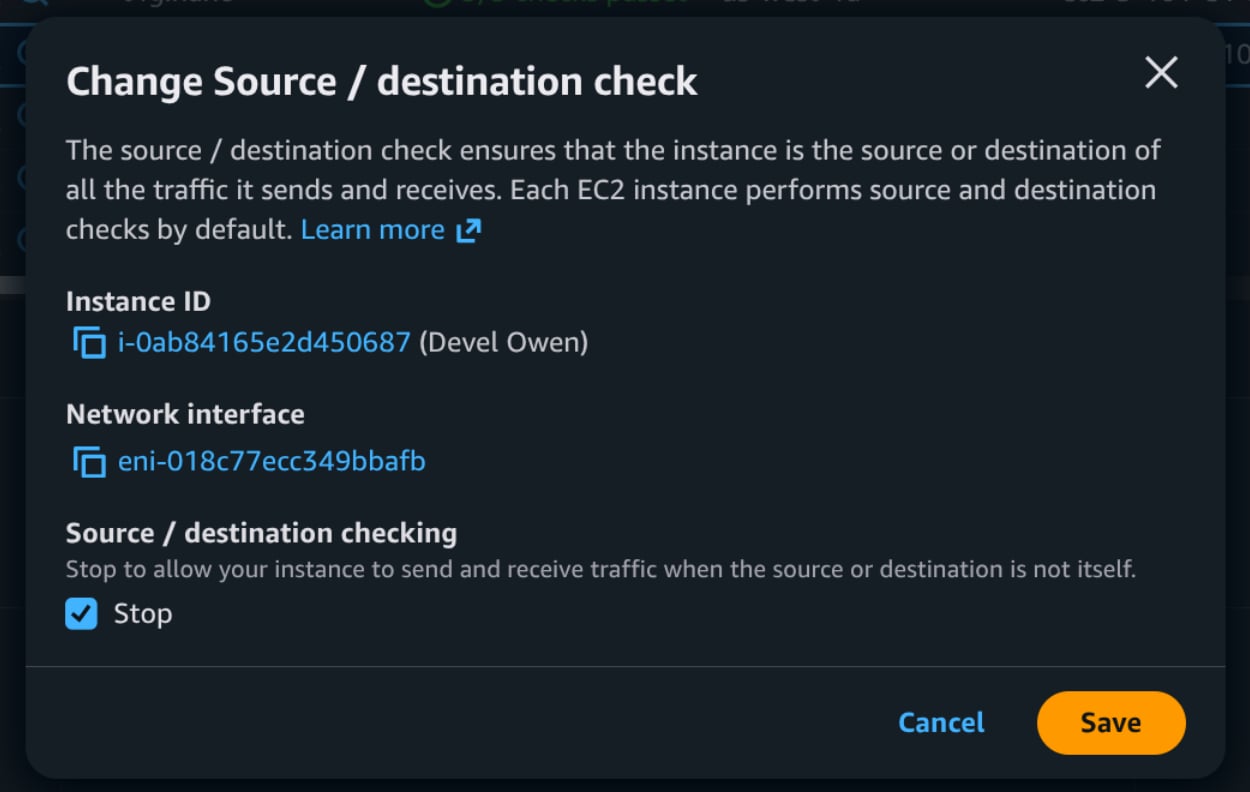
 By default, AWS drops any packet where an instance isn't the source or destination, which would silently break a node that's forwarding traffic on behalf of others. Disable the source/destination check on the node's instance so it's allowed to route traffic that isn't addressed to itself.
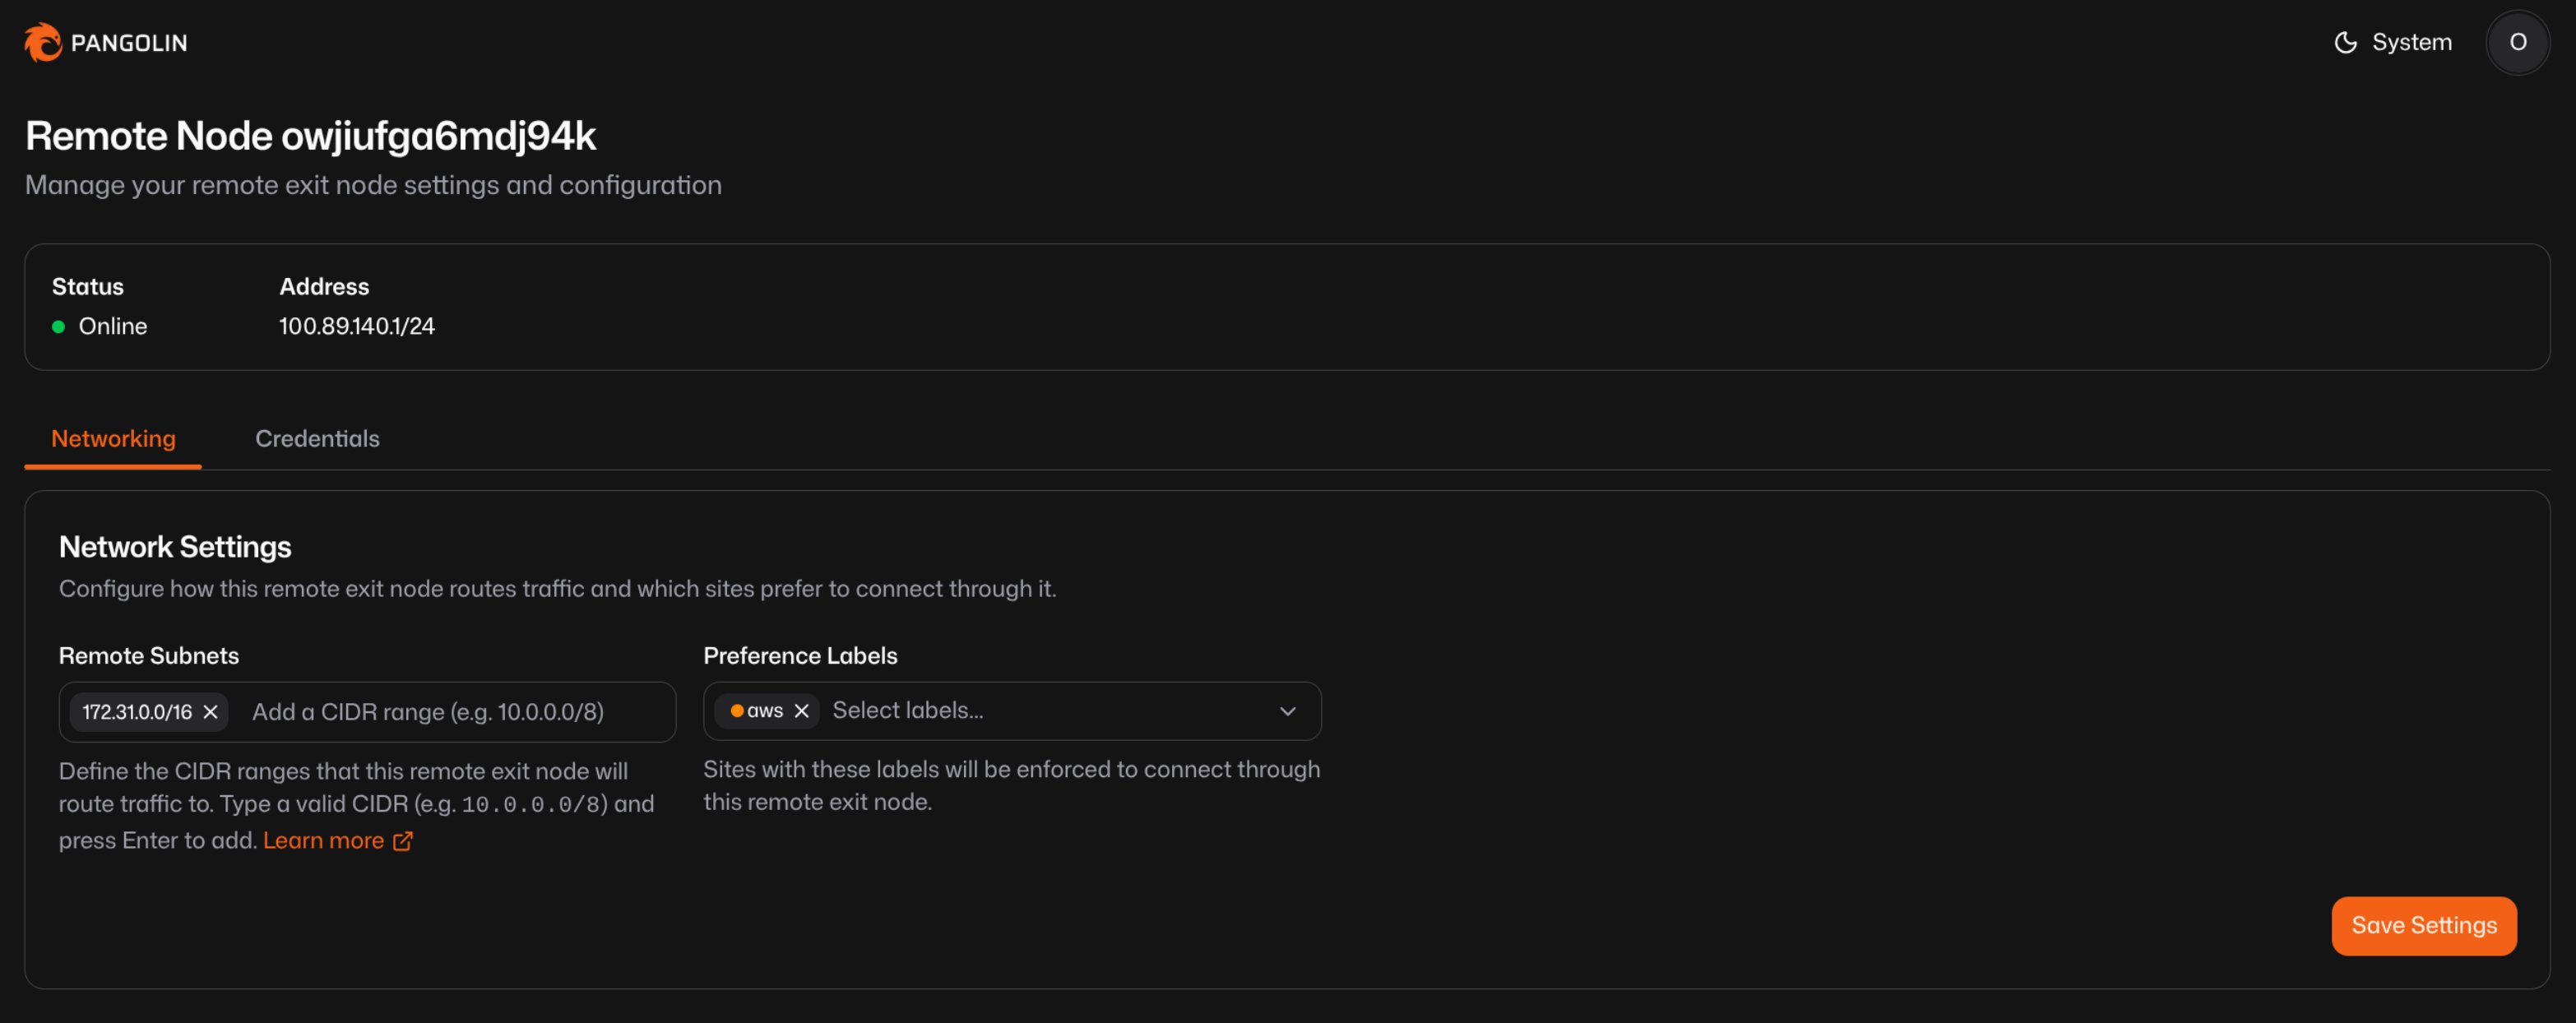
 In the node's settings in the Pangolin dashboard, add the VPC's CIDR (for example, `172.31.0.0/16`) to **Remote Subnets** under the **Networking** tab. This is pushed down to your sites as a route, so they know to send traffic for that subnet through this node's tunnel.
You can also set **Preference Labels** on the node and apply matching labels to sites, which enforces that those sites connect through this remote node specifically. This is useful once you have more than one node or point of presence and want particular sites to always backhaul through this one.
In the node's settings in the Pangolin dashboard, add the VPC's CIDR (for example, `172.31.0.0/16`) to **Remote Subnets** under the **Networking** tab. This is pushed down to your sites as a route, so they know to send traffic for that subnet through this node's tunnel.
You can also set **Preference Labels** on the node and apply matching labels to sites, which enforces that those sites connect through this remote node specifically. This is useful once you have more than one node or point of presence and want particular sites to always backhaul through this one.
 ## Enable Native Routing on Your Sites
For the VPC and a site's network to route to each other, the tunnel needs to be a real route on the site's host, not just something Newt proxies at the application layer. Start Newt with `--native-main` so it creates the network interface and routes directly on the host:
```bash theme={"theme":"gruvbox-light-hard"}
sudo newt --id 34s48my8iba5wsl --secret ts1v7480qqw01j7ba4uiw5y7l58skw7anpji2ndludhgzloh --endpoint https://app.pangolin.net --native-main
```
On Windows, set `nativeMain` in the Newt client's `config.json` instead:
```json title="%PROGRAMDATA%/newt/newt-client/config.json" theme={"theme":"gruvbox-light-hard"}
{
"id": "34s48my8iba5wsl",
"secret": "ts1v7480qqw01j7ba4uiw5y7l58skw7anpji2ndludhgzloh",
"endpoint": "https://app.pangolin.net",
"nativeMain": true
}
```
Windows doesn't respond to ICMP echo requests (ping) over the tunnel interface by default. If you need to ping a Windows site, enable the built-in firewall rule for it:
```powershell theme={"theme":"gruvbox-light-hard"}
Enable-NetFirewallRule -DisplayName "File and Printer Sharing (Echo Request - ICMPv4-In)"
```
## Resolving a Site's Address Directly
If something outside of Pangolin's normal resource routing needs to reach a site directly, for example a static route configured elsewhere in your network, you can resolve `.site.pangolin.net` to get the site's current routable address.
This is useful with backhaul because a site's traffic can move between exit nodes if one becomes unavailable. The DNS record always follows the site to whichever node it's currently connected through.
Expect a short gap in resolution when a site moves between nodes while the DNS record updates.
## High Availability
Deploy multiple nodes in your network. Each node will have a different routable subnet. Repeating the above steps will ensure they are routed to uniquely. Sites will connect to one of the nodes in the network and if it does down fail over to another online node.
Make sure to use the site's DNS address to connect to it as when it moves between nodes its address may change.
## Enable Native Routing on Your Sites
For the VPC and a site's network to route to each other, the tunnel needs to be a real route on the site's host, not just something Newt proxies at the application layer. Start Newt with `--native-main` so it creates the network interface and routes directly on the host:
```bash theme={"theme":"gruvbox-light-hard"}
sudo newt --id 34s48my8iba5wsl --secret ts1v7480qqw01j7ba4uiw5y7l58skw7anpji2ndludhgzloh --endpoint https://app.pangolin.net --native-main
```
On Windows, set `nativeMain` in the Newt client's `config.json` instead:
```json title="%PROGRAMDATA%/newt/newt-client/config.json" theme={"theme":"gruvbox-light-hard"}
{
"id": "34s48my8iba5wsl",
"secret": "ts1v7480qqw01j7ba4uiw5y7l58skw7anpji2ndludhgzloh",
"endpoint": "https://app.pangolin.net",
"nativeMain": true
}
```
Windows doesn't respond to ICMP echo requests (ping) over the tunnel interface by default. If you need to ping a Windows site, enable the built-in firewall rule for it:
```powershell theme={"theme":"gruvbox-light-hard"}
Enable-NetFirewallRule -DisplayName "File and Printer Sharing (Echo Request - ICMPv4-In)"
```
## Resolving a Site's Address Directly
If something outside of Pangolin's normal resource routing needs to reach a site directly, for example a static route configured elsewhere in your network, you can resolve `.site.pangolin.net` to get the site's current routable address.
This is useful with backhaul because a site's traffic can move between exit nodes if one becomes unavailable. The DNS record always follows the site to whichever node it's currently connected through.
Expect a short gap in resolution when a site moves between nodes while the DNS record updates.
## High Availability
Deploy multiple nodes in your network. Each node will have a different routable subnet. Repeating the above steps will ensure they are routed to uniquely. Sites will connect to one of the nodes in the network and if it does down fail over to another online node.
Make sure to use the site's DNS address to connect to it as when it moves between nodes its address may change.